Hoverslams
Hoverslams! For movement planning of spacecraft in Fall Free, I'm working out hoverslams.
For real rockets, "hoverslam" means landing on a pad without excess speed (ie without crashing). This is also akin to orbital insertion maneuvers done by spacecraft in deep space.
For Fall Free I'm defining a hoverslam as a 1D maneuver where a spacecraft approaches a target in open space and arrives there just so, so that its velocity gently reaches zero right on arrival. In addition to the 1D constraint, I'm constraining the spacecraft to have constant acceleration, with thrusters either on or off and pointed wither towards the target or away from it.
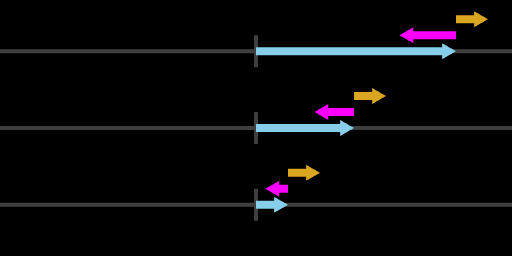
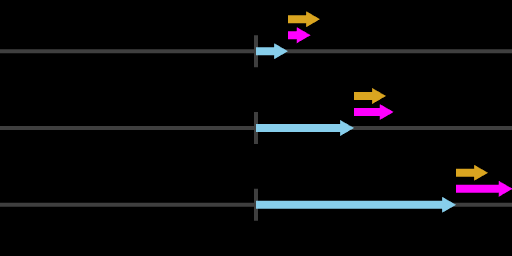
So during the maneuver, the spacecraft will have some displacement from the target, some velocity, and some constant acceleration. Over time these will vary together, for example like this:
Spacecraft displacement from a target (light blue), velocity (magenta), and acceleration (gold)
My goal for this post is to work out how to take some arbitrary starting displacement D(t) and velocity V(t), for a spacecraft, and plan a successful hoverslam to reach a target some distance away.
I found it helpful to work backwards from the goal state, where displacement and velocity are both zero. For convenience I also called this time t equal to zero. So we have t=0, D0 = 0, and V0=0. The only quantity left that's not zero is a, the constant acceleration of the spacecraft.
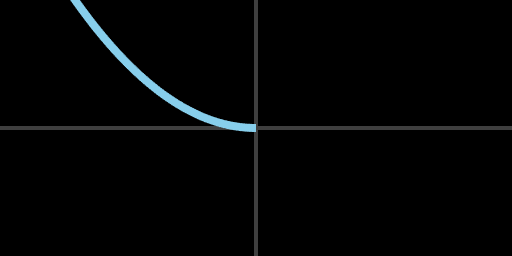
With this we can plot the displacement that the spacecraft must have had as it approached the target. It must have been decelerating with simple projectile motion, with decreasing displacement tracing out a classic parabola.
Displacement (light blue) vs time, approaching zero
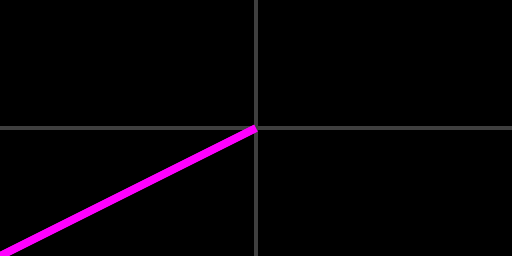
Likewise the the velocity must have been decreasing linearly from some negative value (negative since displacement was decreasing) to reach zero at the same moment -- at the goal.
Velocity (magenta) vs time, approaching zero
For Fall Free, the exact timing of the goal is not important, only that the spacecraft reaches the goal with zero displacement and zero velocity.
To focus on the important values, I found it helpful to take time out of the eqution and consider displacement as a function of velocity. This gives a view of the state space where a spacecraft might find itself, with all the possible pairs of displacement and velocity.
We can get the hoverslam approach curve in state space by rearrangement and substitution of the two equations for D(t) and V(t).
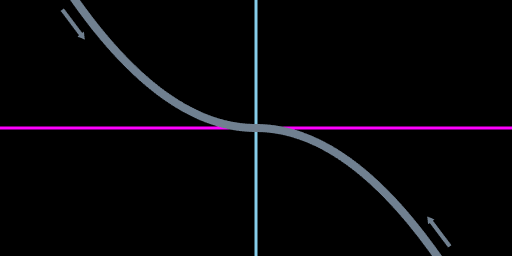
Displacement (vertical axis, light blue) vs velocity (horizontal axis, magenta), with time flowing towards the center
This works out to another classic parabola, but this time the horizontal axis is velocity instead of time, and the leading coefficient is scaled by a factor of 1/a2.
Time is no longer explicit in this view, but we can imagine that time would flow from the top left, down to the origin. This makes sense for positivie acceleration, since moving from left to right corresponds to increasing values of velocity. As before, the origin of this graph represents a completed hoverslam, with velocity and displacement coming together at zero.
How does this help with spacecraft hoverslam planning? It gives us a wider target to aim for. Instead of aiming for a single point at the origin of the state space, we can aim to hit any point along this curve. From there, we know that the way to the origin is always by constant acceleration until t=0.
Before proceeding, let's complete the hoverslam curve to span all of state space. Since Fall Free takes place in open space, spacecraft have the option to approach a target from either side, above or below, left or right, etc (not so for landing rockets on the ground!). So it's valid and equvalent to flip all the signs for displacement, velocity, and acceleration.
This yields a second curve just like the first, but flipped into the lower right quadrant.
State space of displacement (vertical axis, light blue) vs velocity (horizontal axis, magenta) and complete hoverslam curve
For either curve, time would flow towards the origin. Again this is consistent with the direction of acceleration, which is positive in the upper left and negative in the lower right.
These curves cover the upper right and lower left quadrants of state space. I think of these as the helpful quadrants for hoverslams, where displacement and velocity have opposite signs, which means the displacement from target is decreasing in magnitude.
The other quadrants, upper right and lower left are, unhelpful. They have displacement and velocity with the same signs, which means displacement will increase in magnitude over time and the spacecraft would fly away from the target.
Unhelpful velocity (magenta) increasing the absolute value of displacement (light blue) over time
Although two of the quadrants are unhelpful, they still represent valid states for a spacecraft to be in -- we just need a plan to get out of them. So an outline of hoverslam planning can go like this:
- Figure out which part of state space the spacecraft is in.
- Choose an adjustment acceleration that brings the spacecraft into a helpful quadrant and closer to an intersection with the hoverslam approach curve.
- At the moment of intersection with the approach curve, reverse acceleration to be in the hoverslam direction, away from the target, and maintain this until t=0
Since the two hoverslam approach curves meet at the origin of state space and extend to infinity in either direction, it will always be possible to plan an adjustment that intersects one of the curves.
With this outline hoverslam planning is conceptually complete. But for actual implementation I want to make it quantitative: how long should the adjustment acceleration last? At what time will the adjustment bring the spacecraft to the hoverslam curve? How long should the hoverslam approach acceleration last?
To get at these, we can generalize the hoverslam algebra above. The hoverslam was the easy case, where we got to omit projectile motion parameters for initial displacement D0 and initial velocity V0. To describe spacecraft states in general, we need to add these back in. This complicates the algebra somewhat, but the overall shape remains the same.
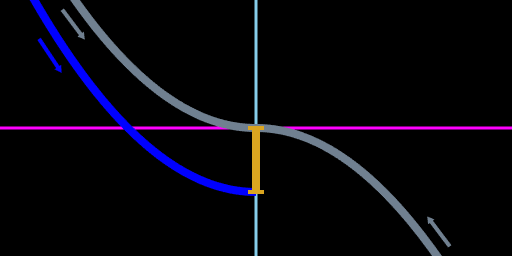
This general version of Dt turns out to be a lot like the original hoverslam Dt. The quadratic Vt2 term is identical and there still is no linear term for Vt. All that changed are two constant terms added at the end, which just amounts to a vertical shift of the hoverslam curve.
Generalized displacement vs velocity as a vertically shifted curve (blue) with just a constant offset (golden) from the original hoverslam curve
This vertical shift has a nice physical interpretation: when a spacecraft decelerates to zero velocity, what will be its displacement at that stopping time? For a hoverslam this is zero. In every other case the spacecraft misses the target by some amount. The new trailing terms tell us by how much it misses.
It’s really handy that the generalized curves and hoverslam curves all have the same parabolic shape, and that they all are centered on the vertical axis. This means we can compute the vertical shift and then purely by symmetry observe where the shifted curve must intersect one of the hoverslam approach curves. They’ll intersect along a horizontal line that cuts the shift in half. As long as we flip the generalized curve the right way around (ie choose to accelerate in the helpful direction), this will always work out.
Generalized displacement parabola (blue) and hoverslam parabola (gray) intersect along a horizontal line (gold) half way between the parabola vertexes
So the quantitative version of hoverslam planning can go as follows. First, choose which way to accelerate for the adjustment phase. There are only two options: if the spacecraft starting state falls above the hoverslam curves, choose -a, otherwise choose +a. Given this choice of acceleration, calculate at what time tmiss the spacecraft will reach zero velocity. This is straightforward by dividing the starting velocity vstart by the chosen acceleration.
From tmiss we can get the vertical shift Dmiss by calculating the spacecraft's displacement at that time.
With the chosen acceleration, tmiss, and Dmiss, we now have the spacecraft registered in state space.
Note that this registration was not automatic because the spacecraft's original projectile motion would be with respect to some other t=0, like when the game started up, as opposed to when some future hoverslam might occur. One way to interprete this tmiss is that it's a conversion from the overall game timeline to the local timeline of a particular hoverslam maneuver.
Almost there now. Starting from tmiss, we want to accelerate towards the target for half the remaining displacement Dmiss. Then we flip from the adjustment phase to the approach phase and accelerate away from the target for the last half. To convert the displacement to a duration, we divide by the acceleration and take the square root.
So that's it. Pick an adjustment acceleration depending on where the spacecraft starts out in state space. A bit of algebra tells us how long to hold on to the adjustment phase. Then flip the acceleration for a final approach phase, where a little more algebra tells us how long this should last. Finally, cut off the acceleration and the hoverslam is complete.
To summarize, here's a color-coded version of the state space and some physical interpretation of each region.
Color-coded state space with golden regions closest to the hoverslam approach curves, and magenta and light blue regions that require adjustment on the way to reaching the golden region
A spacecraft could start out in any of these regions. The colors indicate phases of hoverslam planning like adjustment and approach.
The magenta regions are those unhelpful quadrants of state space where the spacecraft is moving away from the target. From these regions the spacecraft should decelerate to reverse direction. This will bring the spacecraft into one of the golden regions.
The golden regions are hoverslam-ready. The spacecraft should calculate its miss displacement Dmiss which happens when velocity is zero (or was zero in the recent past), at the border with the magenta region. The spacecraft should accelerate towards the target for half that distance, which will last for duration tapproach. This will bring the spacecraft to the hoverslam curve, where it can reverse acceleration and come to a stop at the origin. This final approach phase will also last for duration tapproach.
The light-blue regions are perhaps the worst. In these regions the spacecraft is moving too quickly towards the target, and the fixed acceleration won't be enough to bring it to a stop before overshooting the target. So from here, the spacecraft has no choice but to overshoot and cross from a light blue region into the neighboring magenta region, on the opposite side of the target. With that unpleasantnes behind it, the spacecraft can follow the magental plan above, and make its way to the neighboring golden retion to complete the hoverslam.
